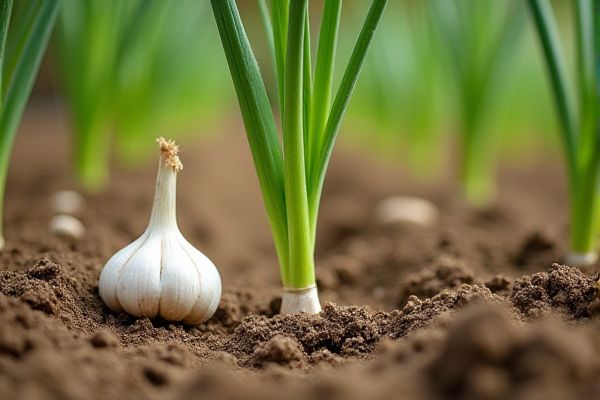
Garlic thrives exceptionally well in sandy loam soil due to its excellent drainage and nutrient retention properties. This soil type allows garlic bulbs to develop fully without the risk of waterlogging, promoting healthy root growth and flavor concentration. Your success in growing robust garlic depends on proper soil preparation, including adding organic matter to improve texture and fertility. Maintaining consistent moisture while avoiding excessive wetness ensures optimal garlic bulb formation in sandy loam conditions.
Best Garlic Varieties for Sandy Loam Soils
Hardneck garlic varieties such as Rocambole and Porcelain thrive in sandy loam soils due to their ability to develop robust bulbs with strong flavors. Softneck types like Silverskin and Artichoke also perform well, offering longer storage life and adaptability to varying moisture levels. Your garlic plants will benefit from well-drained sandy loam as it prevents waterlogging and promotes optimal root growth. Selecting disease-resistant varieties suited for sandy loam ensures higher yields and healthier crops.
Pre-Planting Soil Preparation: Conditioning Sandy Loam
Sandy loam offers excellent drainage and aeration, making it ideal for garlic cultivation. Before planting, enhance soil fertility by incorporating organic matter such as compost or well-rotted manure to improve nutrient retention. Adjust soil pH to a slightly acidic to neutral range (6.0-7.0) for optimal garlic growth. Your garlic will establish stronger roots and produce higher yields with proper soil conditioning tailored to sandy loam.
When to Plant Garlic: Optimal Timing for Sandy Soils
Plant garlic in sandy loam soil during the fall, typically 4 to 6 weeks before the first expected frost date in your region. This timing allows the cloves to establish roots before winter, ensuring robust growth in spring. Sandy loam's excellent drainage helps prevent bulb rot, but maintaining consistent moisture is crucial for optimal development. You should avoid planting too early to prevent premature sprouting and reduce vulnerability to frost damage.
How to Choose and Prepare Garlic Cloves for Planting
Select firm, healthy garlic cloves from organic seed garlic to ensure strong growth in sandy loam soil. Avoid cloves with any signs of mold, damage, or shriveling, as these can hinder development and reduce yield. Before planting, separate the cloves but keep the papery skins intact to protect them from pests and diseases. You should soak the cloves in water for 10-15 minutes to hydrate them, improving root establishment in sandy loam's well-draining conditions.
Spacing and Depth: Planting Garlic Cloves in Sandy Loam
Plant garlic cloves in sandy loam soil with a spacing of 4 to 6 inches between each clove to ensure optimal growth and airflow. Plant cloves at a depth of about 2 inches, with the pointed end facing upward to promote strong root development. Sandy loam's excellent drainage helps prevent waterlogging, which is crucial for healthy garlic cloves. You should also mulch the area to retain moisture and regulate soil temperature during the growing season.
Watering Needs for Garlic in Sandy Loam
Garlic grown in sandy loam requires consistent moisture to develop healthy bulbs, as sandy soil drains quickly and can dry out faster than other soil types. You should water garlic plants deeply once or twice a week, ensuring the soil remains moist but not waterlogged, which can cause root rot. Mulching around garlic helps retain soil moisture and regulate temperature, improving growth in sandy loam conditions. Monitoring soil moisture regularly will help you adjust watering frequency to meet your garlic's specific needs.
Mulching Techniques to Retain Moisture in Sandy Soils
Mulching sandy loam soils when planting garlic enhances moisture retention by reducing evaporation and maintaining consistent soil temperature. Organic mulches like straw, compost, or shredded leaves create a protective layer that improves soil structure and nutrient availability for garlic roots. Applying a 2-3 inch thick mulch layer around garlic bulbs helps conserve water, suppress weeds, and encourage healthy growth. Your garlic plants will benefit from improved moisture levels, leading to stronger, more vigorous growth and higher yields.
Fertilizing Garlic: Best Practices for Sandy Loam
Sandy loam soils require balanced fertilization to support healthy garlic growth, focusing on nitrogen, phosphorus, and potassium levels. Your garlic plants benefit from applying a nitrogen-rich fertilizer early in the growing season to promote strong leaf development. Incorporate organic matter or compost to improve nutrient retention and soil structure since sandy loam drains quickly. Regular soil testing helps adjust fertilizer application for optimal garlic bulb size and flavor.
Weed Management in Sandy Garlic Beds
Effective weed management in sandy loam garlic beds involves regular cultivation to disrupt weed growth and improve soil aeration. Mulching with organic materials like straw or leaves suppresses weed emergence while conserving soil moisture. Applying pre-emergent herbicides designed for sandy soils can prevent weed seeds from germinating without harming garlic plants. Properly managing weeds enhances your garlic crop's growth by reducing competition for nutrients and water.
Monitoring and Preventing Pests and Diseases
Garlic planted in sandy loam requires regular monitoring to prevent common pests such as onion thrips and nematodes that can damage bulbs. Implementing crop rotation and maintaining proper spacing reduces the risk of disease spread like white rot and downy mildew. Your early detection of yellowing or distorted leaves helps in applying targeted organic or chemical treatments promptly. Consistent soil drainage management in sandy loam also minimizes fungal infections, ensuring healthy garlic growth.
When and How to Remove Garlic Scapes
Garlic scapes should be removed when they begin to curl, usually in late spring or early summer, to encourage the bulb to grow larger. Using clean, sharp scissors or pruners, cut the scapes about one to two inches above the top leaf. Removing garlic scapes promptly prevents the plant from wasting energy on flowering, directing nutrients back to Your bulb development. Proper handling and timely removal in sandy loam soil conditions result in healthier and more robust garlic bulbs.
Signs Your Garlic is Ready to Harvest
Garlic planted in sandy loam soil typically shows readiness for harvest when the lower leaves turn brown while the upper leaves remain green. You can also observe the bulbs swelling and becoming firm, indicating maturation. The ideal time to harvest is when about half to two-thirds of the foliage has dried, usually 8-10 months after planting. Proper timing ensures the best flavor and storage quality for your garlic.
Harvesting Garlic: Techniques for Sandy Soils
Harvest garlic in sandy loam soils when the lower leaves turn brown while the upper leaves remain green, typically 8 to 10 months after planting. Use a garden fork to gently loosen the soil around each bulb, taking care not to damage the cloves. After lifting the bulbs, cure them by drying in a warm, well-ventilated area for two to three weeks to ensure longevity and storage quality. Your harvested garlic will retain optimal flavor and shelf life when properly handled in sandy soil conditions.
Curing and Storing Garlic After Harvest
Curing garlic harvested from sandy loam soil involves drying the bulbs in a well-ventilated, shaded area for about two to three weeks to enhance shelf life. Proper curing reduces moisture content, preventing mold and rot during storage. Store your garlic in cool, dry conditions with good air circulation, such as mesh bags or baskets, to maintain freshness for several months. Monitoring the stored garlic periodically helps identify any spoilage early, ensuring optimal quality.
Top Tips to Maximize Garlic Yield in Sandy Loam
Sandy loam soil provides excellent drainage and aeration, ideal for garlic growth. Ensure your garlic cloves are planted 2 inches deep and spaced 4-6 inches apart to promote healthy bulb development. Regularly water your garlic to maintain consistent moisture without waterlogging the soil. You can boost yield by applying balanced fertilizer rich in nitrogen during the early growth stages.