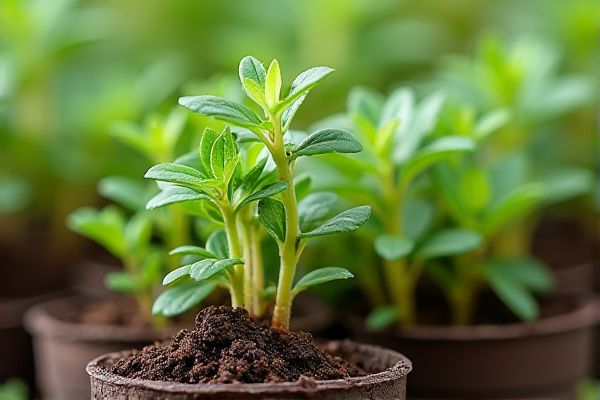
Planting marjoram in biodegradable pots simplifies the transplant process by reducing root disturbance and minimizing transplant shock. These eco-friendly containers decompose naturally, enriching the soil with organic matter as they break down. Your marjoram seedlings establish healthier root systems and adapt more quickly to outdoor conditions when transferred directly into the garden without removing them from the pots. Choosing biodegradable pots supports sustainable gardening practices while promoting robust growth.
Why Biodegradable Pots Are Ideal for Marjoram Transplants
Biodegradable pots provide optimal aeration and drainage for marjoram roots, promoting healthy growth during transplanting. These pots break down naturally in the soil, reducing transplant shock and encouraging root expansion without disturbance. Using biodegradable containers helps you maintain an eco-friendly garden while ensuring your marjoram plants establish quickly and thrive. This method also eliminates plastic waste, supporting sustainable gardening practices.
Choosing the Right Biodegradable Pot for Marjoram
Selecting a biodegradable pot made from materials like coconut coir or peat moss ensures optimal root aeration and moisture retention for marjoram seedlings. These pots break down naturally in soil, reducing transplant shock and promoting healthy growth. You can plant the entire pot directly into the garden, minimizing root disturbance and supporting strong establishment. Proper pot size, typically 3 to 4 inches in diameter, allows sufficient space for marjoram root development during early growth stages.
Selecting High-Quality Marjoram Seeds
Choose high-quality Marjoram seeds with a high germination rate to ensure robust growth. Your seedlings will benefit from the use of biodegradable pots, which promote healthy root development and easy transplanting. Moisture retention and aeration in these pots support optimal seedling establishment. Proper seed selection combined with eco-friendly containers enhances your chances of producing vigorous Marjoram plants.
Optimal Soil Mix for Biodegradable Pots
Marjoram thrives best in a well-draining soil mix to prevent root rot, making a blend of equal parts peat moss, compost, and perlite ideal for biodegradable pots. This mixture ensures your marjoram receives adequate aeration and moisture retention while supporting healthy root development. Incorporating organic matter like compost provides essential nutrients for vigorous growth before transplanting. Your biodegradable pots will gradually break down, allowing the roots to easily expand into the garden soil.
Proper Moisture Levels for Marjoram Germination
Maintaining proper moisture levels is crucial for successful marjoram germination when using biodegradable pots. The soil should be consistently moist but not waterlogged to prevent seed rot and promote healthy root development. Biodegradable pots help retain moisture while allowing excess water to drain, creating an ideal environment for seedling growth. You should check the substrate daily to ensure it stays damp, supporting strong and vigorous marjoram plants.
Ideal Light Conditions for Seed Starting Indoors
Marjoram seeds thrive under bright, indirect light when started indoors, ideally receiving 12-16 hours of light daily from a grow light or a sunny south-facing window. Maintaining soil temperatures between 70degF and 75degF promotes optimal germination and early growth. Using biodegradable pots allows you to transplant marjoram seedlings directly into your garden, minimizing root disturbance and transplant shock. Your marjoram plants will benefit from consistent moisture and good air circulation during this critical early stage.
Sowing Depth and Spacing for Marjoram Seeds
Marjoram seeds should be sown at a shallow depth of about 1/8 inch (3 mm) to ensure optimal germination. Space the seeds approximately 6 to 8 inches (15 to 20 cm) apart in biodegradable pots to provide ample room for root growth and aeration. Using biodegradable pots simplifies the transplant process by minimizing root disturbance and allowing the pots to decompose naturally in the soil. Proper spacing and sowing depth enhance your marjoram plants' healthy establishment when moving them to the garden.
Maintaining Consistent Warmth for Healthy Growth
Maintaining consistent warmth around your marjoram seedlings in biodegradable pots promotes robust root development and prevents transplant shock. Ideal soil temperature for marjoram ranges between 65degF and 75degF, ensuring optimal enzymatic activity and nutrient uptake. You can use heat mats or place the pots in a sunny spot indoors to sustain this warmth. Keeping the soil consistently warm encourages faster germination and healthy growth before transplanting outdoors.
Fertilizer Tips Specifically for Marjoram Seedlings
Marjoram seedlings benefit from a balanced fertilizer with an N-P-K ratio of 10-10-10, applied sparingly to avoid nutrient burn in biodegradable pots. Use a diluted liquid fertilizer every two weeks to support steady growth during the early transplant stage. Ensure the pots have proper drainage to prevent waterlogging, which can reduce nutrient uptake. Your marjoram will thrive with consistent moisture and mild fertilization tailored to young plants.
Hardening Off Marjoram Before Outdoor Transplant
Hardening off Marjoram involves gradually exposing the plants to outdoor conditions to reduce transplant shock. Start by placing your Marjoram seedlings in biodegradable pots outside for a few hours each day, increasing the time over 7-10 days. Ensure they receive indirect sunlight initially and protect them from strong winds or heavy rain. This acclimation process improves survival rates and promotes healthy growth after transplanting into the garden.
Proper Watering Techniques for Young Marjoram Plants
Young Marjoram plants require consistent moisture in biodegradable pots to ensure healthy root development and successful transplanting. Water your seedlings thoroughly when the top inch of soil feels dry, avoiding waterlogging to prevent root rot. Using a spray bottle or gentle watering can helps maintain even soil moisture without disturbing delicate roots. Monitoring moisture levels regularly supports vigorous growth and smooth transplantation.
How to Prevent Damping Off and Fungal Issues
To prevent damping off and fungal issues when planting Marjoram in biodegradable pots, use a well-draining seed starting mix to reduce excess moisture. Ensure proper air circulation around the pots by spacing them adequately and avoid overwatering, allowing the soil surface to dry slightly between waterings. Applying a light dusting of cinnamon or a natural fungicide on the soil can help inhibit fungal growth. Your careful monitoring of humidity and temperature will significantly reduce the risk of seedling diseases.
Signs Your Marjoram Is Ready for Outdoor Transplant
Healthy Marjoram seedlings display strong stems and vibrant green leaves, typically reaching 3-4 inches in height before transplanting. Your biodegradable pots should allow for easy root penetration and minimal disturbance during the move. Soil moisture must be consistently maintained to prevent transplant shock and promote establishment in the outdoor environment. Checking for well-developed root systems visible through the pot helps confirm transplant readiness.
Best Practices for Transplanting with Biodegradable Pots
Using biodegradable pots for planting marjoram ensures minimal root disturbance during transplanting, promoting healthier growth. These pots allow roots to penetrate naturally, improving aeration and moisture retention essential for marjoram's development. When transplanting, place the entire pot into the soil to support your plant's transition and reduce transplant shock. Properly selecting and handling biodegradable pots enhances your marjoram's establishment and long-term vitality.
Ongoing Marjoram Care After Transplanting Outdoors
After transplanting your marjoram outdoors, water the plants thoroughly to settle the soil and encourage root establishment. Ensure the biodegradable pots degrade properly in the soil by monitoring moisture levels to prevent waterlogging. Marjoram thrives in well-drained soil with full sunlight, so choose an appropriate location and maintain regular watering schedules. Fertilize lightly with a balanced organic fertilizer every four to six weeks to support healthy growth and aromatic leaves.