Planting potatoes in straw bales offers an efficient and space-saving gardening method ideal for both beginners and experienced gardeners. Straw bales provide excellent drainage and warmth, promoting healthy tuber development. This soil-free technique reduces weed growth and simplifies harvesting, making your potato cultivation more manageable. By using straw bales, you can enjoy a productive potato harvest even in limited or poor-quality soil conditions.
Straw Bale Selection: Choosing the Right Bales for Potatoes
Select straw bales that are fresh, dry, and free from mold or weed seeds to ensure healthy potato growth. Opt for bales made from wheat or oat straw, as they decompose well and provide excellent aeration for root development. Your bales should be tightly bound and dense enough to retain moisture, which supports tuber formation. Proper bale choice sets a strong foundation for a successful potato harvest.
Prepping the Bale: Conditioning Steps Before Planting
To prepare your straw bale for planting potatoes, begin by thoroughly wetting it to initiate decomposition. Apply a balanced fertilizer high in nitrogen every few days to accelerate the breakdown of straw fibers, creating a nutrient-rich environment. Over 10-14 days, maintain moisture and continue fertilizing until the bale feels warm and soft to the touch. This conditioning process ensures optimal soil-like conditions for your potato tubers to grow vigorously.
Seed Potato Selection: Picking Disease-Free Varieties
Choose certified seed potatoes free from common diseases like late blight and powdery scab to ensure healthy crop growth. Select varieties adapted to your climate and resistant to local pests to increase yield and reduce chemical use. Your straw bale planting will benefit from seed potatoes with high germination rates, promoting vigorous sprout development. Inspect each tuber carefully for cuts, bruises, or signs of rot before planting to maintain crop quality.
Cutting and Chitting: Preparing Seed Potatoes for Planting
Cutting seed potatoes into pieces with at least one eye each ensures successful sprouting when planted in straw bales. Chitting, the process of pre-sprouting seed potatoes in a cool, bright environment, accelerates growth and improves yield. When you cut and chit your seed potatoes properly, you promote strong shoots that establish quickly in the straw bale medium. Thorough preparation of seed potatoes is essential for maximizing your potato harvest.
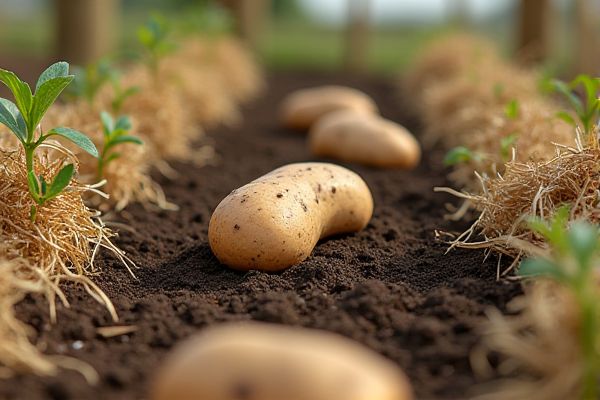
Planting Potatoes in Straw: Proper Spacing and Depth
Planting potatoes in straw bales requires maintaining a spacing of about 12 inches between each seed potato to ensure sufficient room for tuber growth. Your seed potatoes should be planted at a depth of approximately 4 to 6 inches beneath the straw surface to promote healthy root development. Straw provides excellent insulation and drainage, reducing the risk of rot and encouraging consistent moisture retention. Monitoring soil temperature and moisture levels within the straw bales will optimize conditions for robust potato growth.
Placement and Sunlight: Positioning Bales for Maximum Growth
Place your straw bales in a location receiving at least 6 to 8 hours of direct sunlight daily to ensure optimum photosynthesis and tuber development. Position bales on well-drained ground to prevent waterlogging, which can cause rot and hinder root growth in potato plants. Elevating bales slightly improves air circulation, reduces pest problems, and supports healthy plant development. Proper placement maximizes sunlight exposure, directly influencing the yield and quality of your potato harvest.
Watering Schedule: Keeping Straw Bales Moist for Sprouting
Maintaining consistent moisture in straw bales is essential for successful potato sprouting. Water your straw bales thoroughly, ensuring they stay evenly damp but not waterlogged. Check moisture levels daily, especially during dry spells, to prevent the straw from drying out and hindering tuber growth. Proper hydration fosters healthy sprout development, leading to a more productive potato harvest.
Fertilizing the Bales: Essential Nutrients for Potato Growth
Straw bales require nutrient-rich fertilization to support optimal potato growth. Applying a balanced fertilizer containing nitrogen, phosphorus, and potassium ensures the plants develop strong roots and tubers. You should feed the bales with compost or organic matter to enhance moisture retention and nutrient availability. Regularly monitoring and adjusting fertilization helps maximize your potato yield in straw bale planting.
Pest and Disease Management: Preventative Care Tips
Protect your potato plants in straw bales by regularly inspecting for common pests like aphids, beetles, and slugs. Use organic neem oil sprays or insecticidal soap to control infestations without harming the soil ecosystem. Rotate straw bale planting locations yearly to minimize soil-borne diseases such as blight and rot. Apply mulch around the base to maintain moisture and reduce fungal infections, ensuring healthier yields.
Weed Control: Keeping Your Potato Bales Clean
Maintaining weed control in potato straw bales is essential for maximizing yield and preventing competition for nutrients. Use pre-emergent herbicides suitable for straw bale gardening or manually remove weeds regularly to protect your potatoes. Mulching the top of the straw bale with straw or compost can also reduce weed growth and help retain moisture. Your careful management ensures healthier plants and a more productive harvest.
Managing Temperature: Protecting Against Frost and Heat
Straw bales provide excellent insulation for potato plants, helping to maintain a stable root zone temperature. To protect your potatoes from frost, cover the bales with frost cloth or mulch during cold nights, preventing damage to emerging shoots. During hot weather, shade the bales or water regularly to keep the temperature down and reduce stress on the plants. Proper temperature management enhances tuber development and increases overall yield.
Supporting Tall Growth: Preventing Potato Plants from Toppling
Potato plants grown in straw bales require sturdy support to prevent toppling during their tall growth stages. Utilizing stakes or cages around the bales helps maintain plant stability and encourages healthy development. You should regularly check the supports and adjust them as the plants grow taller. Proper support reduces damage risks and improves tuber quality by allowing optimal light exposure and air circulation.
Monitoring for Maturity: Signs Your Potatoes Are Ready
Potatoes planted in straw bales typically mature within 10 to 12 weeks, depending on the variety and growing conditions. You can tell your potatoes are ready when the foliage begins to yellow and die back, indicating tubers have reached full size. Gently lifting a bale to inspect a few potatoes can confirm their size without disturbing the entire crop. Proper timing ensures optimal flavor and texture for your harvest.
Harvesting Potatoes from Straw Bales: Easy Collection Methods
Harvesting potatoes from straw bales allows for straightforward and clean collection since the tubers grow within the loose straw medium. You can simply pull apart the straw bale or shake it gently to reveal the mature potatoes without digging into soil. This method reduces soil compaction and minimizes damage to the potatoes during harvest. Using straw also enhances drainage and pest control, improving overall crop quality.
Post-Harvest Care: Storing and Curing Your Potato Crop
After harvesting potatoes from straw bales, dry them thoroughly to prevent mold and rot during storage. Store your potatoes in a cool, dark, and well-ventilated area with temperatures between 45-55degF (7-13degC) to maintain quality. Curing potatoes for about 1-2 weeks at slightly warmer temperatures around 60-65degF (15-18degC) helps to heal minor skin injuries and prolong shelf life. Check your crop regularly to remove any spoiled potatoes and avoid contamination.