Planting chives in fall encourages sturdy root development and early spring growth. Cool soil temperatures allow seeds to germinate before winter dormancy sets in. Chives thrive in well-drained, fertile soil enriched with organic matter, ensuring a healthy start. Your garden will benefit from fresh, flavorful chives ready to harvest as soon as spring arrives.
Why Plant Chives in Fall? Seasonal Advantages Explained
Planting chives in fall allows the roots to establish during the cooler months, resulting in a more vigorous spring harvest. Chives are hardy perennials that tolerate cold weather, making them ideal for fall planting in USDA zones 3-8. By planting now, your chives benefit from natural stratification, which improves germination rates and flavor development. This seasonal advantage ensures a lush, flavorful herb supply when spring arrives.
Choosing the Best Chive Varieties for Fall Planting
Selecting hardy chive varieties such as Giant Siberian, Garlic Chives, or Common Chives ensures robust growth during the cooler fall months. These varieties tolerate frost and establish strong root systems before winter, promoting a bountiful spring harvest. Plant your chives in well-drained soil with full sun exposure to maximize growth and flavor development. Proper variety selection directly impacts the vitality and yield of Your spring chive crops.
Preparing Your Garden Soil for Fall Chive Sowing
Prepare your garden soil for fall chive sowing by selecting a well-drained, sunny location that receives at least 6 hours of sunlight daily. Loosen the soil to a depth of 8-10 inches and incorporate organic matter such as compost or aged manure to improve fertility and drainage. Maintain a soil pH between 6.0 and 7.0 to optimize nutrient availability for robust chive growth. Your careful soil preparation ensures healthy roots and a bountiful spring harvest.
When to Plant Chive Seeds in Autumn for Optimal Growth
Plant chive seeds in early to mid-autumn, ideally between late September and early November, to ensure they establish strong roots before winter. The soil temperature should be consistently around 50degF (10degC) or higher to promote seed germination. Choosing a well-drained, fertile spot with full sun exposure maximizes your chives' growth potential. Providing a mulch layer can protect the young plants from frost, supporting a healthy spring harvest.
Step-by-Step: How to Sow Chive Seeds in the Fall
Sowing chive seeds in the fall ensures a vibrant spring harvest with minimal effort. Begin by selecting a sunny spot with well-drained soil, enriching it with compost to boost nutrient content. Scatter the seeds thinly over the prepared bed and lightly cover them with about 1/4 inch of soil for optimal germination. Your chives will establish roots during the cooler months, ready to flourish as temperatures rise in spring.
Watering Tips for Chive Seedlings in Cooler Months
Chive seedlings require consistent moisture during the cooler fall months to establish strong roots for a vibrant spring harvest. Your watering routine should keep the soil evenly moist but not soggy, as overwatering can lead to root rot. Early morning watering helps reduce evaporation and allows foliage to dry, preventing fungal diseases. Monitoring soil moisture with your finger can ensure you provide the right amount of water for healthy chive growth.
Protecting Chive Plants from Early Frost and Cold Spells
Chive plants benefit from being planted in the fall, allowing their roots to establish before spring harvest. To protect your chives from early frost, apply a layer of mulch such as straw or shredded leaves around the base of the plants. Frost blankets or row covers can shield them from sudden temperature drops and cold spells. Ensuring proper winter protection supports healthy growth and maximizes your spring yield.
Mulching Techniques to Insulate Chive Roots Over Winter
Applying a thick layer of organic mulch, such as straw or shredded leaves, helps insulate chive roots during the cold winter months, preventing frost damage. Mulching maintains soil moisture and temperature, which promotes healthy root development and ensures a vigorous spring harvest. You should apply mulch after the first frost to protect the plants without encouraging premature growth. Proper mulching techniques extend the growing season and improve the overall quality of your chives.
Fertilizing Chives in the Fall: What You Need to Know
Applying a balanced fertilizer rich in nitrogen during the fall helps enhance root development for your chives, promoting vigorous growth in spring. Incorporate organic compost or well-rotted manure into the soil before planting to improve nutrient availability and soil structure. Avoid excessive phosphorus, as chives primarily benefit from nitrogen and potassium for healthy leaves. Your fall fertilization routine sets the foundation for a lush and flavorful chive harvest come spring.
Managing Weeds Around Chives Through the Dormant Season
Weeds can compete with chives for nutrients and water during the dormant fall and winter months. Applying a thick layer of mulch around your chive plants helps suppress weed growth while retaining soil moisture. Regularly inspecting the chive bed and manually removing any emerging weeds prevents them from establishing deep roots. Maintaining clear space around your chives ensures a healthy, vigorous spring harvest.
Pests and Diseases: Fall Threats to Watch for with Chives
Chives planted in fall can face common pests like aphids and onion maggots, which thrive in cooler temperatures and damp soil. Fungal diseases such as powdery mildew and downy mildew often appear during wet autumn conditions, potentially stunting your chives' growth. Ensuring proper spacing and air circulation helps reduce disease risk, while using neem oil or insecticidal soap can control pest infestations effectively. Monitoring your chives regularly in fall allows you to manage these threats early for a healthy spring harvest.
Overwintering Chives: Best Practices for Healthy Plants
Plant chives in fall to establish strong roots that survive winter and produce a vibrant spring harvest. Choose a well-drained, sunny location with fertile soil enriched by compost to boost overwintering success. Mulching with straw or shredded leaves protects the crowns from frost damage and retains moisture. Your early planting ensures vigorous growth and flavorful chives ready for spring use.
Encouraging Robust Root Development Before Spring
Planting chives in fall allows your plants to establish strong roots during the cooler months, ensuring vigorous growth in spring. The extended cold period helps the chives develop a deeper root system, which enhances nutrient absorption and drought resistance. Well-established roots contribute to higher yields and healthier foliage when warmer weather arrives. Preparing your garden bed with rich, well-drained soil maximizes the benefits of fall planting for a successful spring harvest.
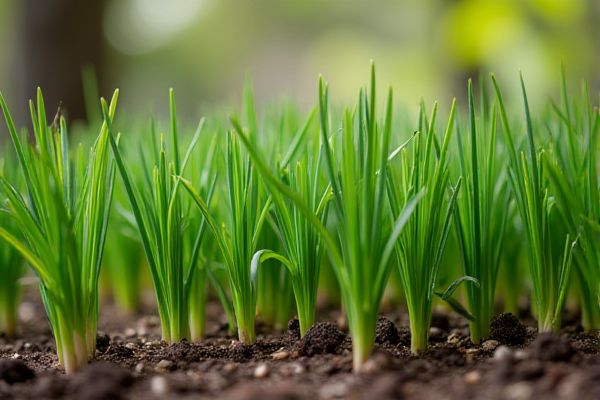
Signs Your Chives Are Ready for Early Spring Harvest
Chives planted in fall develop strong, healthy bulbs during the cold months, preparing them for a productive early spring harvest. You can identify readiness by the vibrant green coloration and firm texture of the leaves, indicating robust growth and nutrient absorption. Measuring leaf height between 6 to 12 inches signals optimal maturity for harvesting, ensuring maximum flavor and potency. Regularly inspecting your chive patch for signs of new growth will help time your harvest precisely and enhance your culinary experience.
Harvesting Chives: Timing and Technique for Maximum Flavor
Harvest chives in early spring when their leaves are vibrant green and about 6 to 8 inches tall to maximize flavor and tenderness. Use clean, sharp scissors to trim the leaves about 1 to 2 inches above the soil, promoting healthy regrowth. Regular trimming encourages bushier growth, ensuring a continuous supply of fresh chives throughout the season. Your careful timing and technique will enhance both the flavor and yield of your spring chives.