Chives thrive in raised garden beds by benefiting from well-drained soil and excellent airflow, which reduce the risk of root rot and pests. These herbaceous perennials prefer full sun exposure and require consistent moisture to develop flavorful, tender leaves. You can enhance growth by incorporating organic compost into the soil before planting, ensuring nutrient-rich conditions. Proper spacing of 8 to 12 inches allows optimal air circulation and encourages healthy clump formation.
Choosing the Best Chive Varieties for Raised Beds
Selecting the best chive varieties for raised garden beds involves considering traits like growth habit and flavor intensity. Popular types include garlic chives, known for their flat leaves and mild garlic flavor, and common chives, which have slender, tubular leaves with a classic onion taste. Your raised bed's soil quality and drainage will support these varieties well, promoting vigorous growth and rich harvests. Opt for disease-resistant cultivars to ensure a thriving chive patch year-round.
Selecting the Ideal Raised Bed Location for Chives
Choose a raised garden bed location that receives full sun to partial shade, as chives thrive best with at least six hours of sunlight daily. Soil should be well-draining and rich in organic matter to promote healthy root development. Ensure easy access to water, since consistent moisture levels are crucial for chive growth without waterlogging. Your raised bed placement impacts air circulation, which helps prevent fungal diseases and supports vibrant, flavorful chives.
Preparing Soil Mix for Thriving Chive Plants
Ensure your raised garden bed soil has excellent drainage and is rich in organic matter, such as compost or well-rotted manure, to support healthy chive growth. Incorporate a balanced fertilizer with an N-P-K ratio around 10-10-10 to provide essential nutrients. Aim for a slightly acidic to neutral pH between 6.0 and 7.0 to optimize nutrient uptake by your chive plants. Regularly loosening the soil maintains aeration, encouraging strong root development and thriving harvests.
Sowing Chive Seeds or Transplanting Seedlings
When sowing chive seeds directly in raised garden beds, plant them about 1/4 inch deep and space seeds 1 to 2 inches apart to ensure proper growth. Transplanting chive seedlings involves spacing them 6 to 8 inches apart to allow ample room for mature clumps to expand. Your garden soil should be rich, well-drained, and consistently moist to promote healthy root development. Raised beds warm up quickly, providing an ideal environment for chives to thrive throughout the growing season.
Watering Strategies for Healthy Chive Growth
Maintaining consistent moisture in raised garden beds is essential for healthy chive growth. Chives thrive when the soil remains evenly damp but not waterlogged, with about 1 inch of water per week being ideal. Using drip irrigation or soaker hoses can help deliver water directly to the root zone, reducing evaporation and promoting efficient watering. Your chives will develop stronger stalks and flavorful leaves with proper watering techniques tailored to raised bed conditions.
Providing Optimal Sunlight Exposure
Chives thrive with at least 6 hours of full sunlight daily, ensuring robust growth and flavorful leaves. Position your raised garden beds in a south-facing area to maximize sunlight exposure throughout the day. Avoid shaded spots near trees or buildings that can limit the light your chives receive. Proper sunlight increases chlorophyll production, enhancing the overall health and yield of your chive plants.
Fertilizing Chives in Raised Beds: Best Practices
Chives thrive in well-drained, nutrient-rich soil, making raised garden beds ideal for their growth. Use a balanced fertilizer with equal parts nitrogen, phosphorus, and potassium, such as a 10-10-10 formula, to promote healthy foliage and strong root systems. Apply fertilizer every 4-6 weeks during the growing season to maintain optimal nutrient levels. Your chives will benefit from organic compost or well-rotted manure mixed into the soil before planting to enhance soil fertility.
Mulching Techniques to Retain Moisture
Mulching chives in raised garden beds helps retain soil moisture by reducing evaporation and keeping temperatures stable. Use organic mulches like straw, shredded leaves, or compost to create a protective layer around the plants. Applying a 2-3 inch thick mulch layer ensures consistent moisture levels and suppresses weed growth. Proper mulching improves your chives' growth and overall health by maintaining optimal soil conditions.
Companion Planting: Best Neighbors for Chives
Chives thrive when planted alongside carrots, tomatoes, and strawberries, as these companions enhance growth and repel pests. Your raised garden bed will benefit from the natural pest control chives provide, especially deterring aphids and carrot flies. Basil and roses are also excellent chive neighbors, improving flavor and health. Planting these together optimizes space and promotes a thriving garden ecosystem.
Managing Pests and Diseases Organically
Chives thrive in raised garden beds when pests like aphids and thrips are controlled organically using neem oil or insecticidal soap. Introducing beneficial insects such as ladybugs and lacewings can help keep pest populations in check without harming your plants. Maintaining good air circulation and avoiding overhead watering reduces the risk of fungal diseases like powdery mildew. Monitoring your chives regularly ensures early detection and treatment, preserving the health and productivity of your garden.
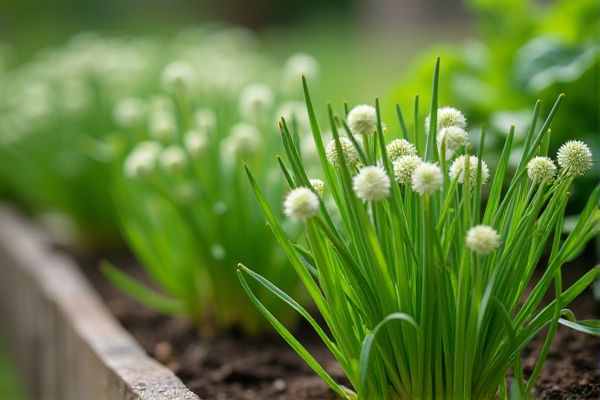
Regular Harvesting for Continuous Production
Harvest chives regularly to encourage steady growth and maintain fresh flavor. Trim the leaves about 1 to 2 inches above the soil to prevent damage to the plant and promote new shoots. Your raised garden beds provide excellent drainage and nutrient retention, supporting robust and continuous production. Consistent harvesting not only enhances yield but also keeps pest issues at bay.
Pruning and Deadheading to Promote Growth
Pruning chives in raised garden beds encourages new growth by removing older, less productive leaves. Deadheading, or trimming flower stalks before they bloom, directs the plant's energy toward foliage development rather than seed production. Regular maintenance helps maintain a tidy garden bed and improves air circulation around the chives, reducing disease risk. You should prune and deadhead chives every few weeks for optimal harvest and plant health.
Overwintering Chives in Raised Beds
To overwinter chives in raised garden beds, ensure your plants receive adequate mulch like straw or shredded leaves to protect roots from freezing temperatures. Keep the soil consistently moist but avoid waterlogging, as chives are susceptible to root rot in overly wet conditions. Prune back the foliage to about 2 inches above the soil before heavy frost to encourage healthy regrowth in spring. Your raised beds should have good drainage to prevent ice damage during winter months.
Revitalizing Soil for Next Season’s Chive Crop
Revitalizing soil in raised garden beds is essential for a healthy chive harvest. Incorporate organic compost and well-rotted manure to improve soil fertility and drainage. Your soil's pH should be slightly acidic to neutral, ideally between 6.0 and 7.0, for optimal chive growth. Regularly amending the soil with nutrients ensures robust, flavorful chives for the next season.
Troubleshooting Common Chive Growing Problems
Chives thrive best in well-drained soil with full sun exposure, which helps prevent fungal diseases such as powdery mildew and root rot. Yellowing leaves often indicate overwatering or poor drainage, so ensure your raised garden beds have proper drainage to keep roots healthy. Pests like aphids and thrips can damage chives, but treating affected plants with insecticidal soap or neem oil can manage infestations effectively. Monitor your chives regularly to catch problems early and maintain vigorous growth.